Friday, February 27, 2009

BAKED POTATO SOUP


I love potato soup but usually make it the traditional way. Baked Potato Soup is different. It's supposed to taste like a loaded baked potato.
A recipe from cookingcache.com got me started. First, I halved the recipe, then I increased the chicken broth, decreased the milk and subbed some Neufchatel cheese for the sour cream (because I didn't have any sour cream). Actually, I kind of remade the recipe.
My version is low-er fat, but it's not low on flavor. This soup is rich, creamy and delicious with hearty flavors. A real keeper -- my new favorite potato soup. It's not at all hard to make. And did I mention that my fussy hubby loved it, too?
Baked Potato Soup
Adapted from cookingcache.com
Rating: 10 out of 10
INGREDIENTS: 2 very large baking potatoes
2 Tbsp. Smart Balance Buttery Spread
1/4 cup chopped onion
2 Tbsp. Neufchatel cheese
2 Tbsp. flour
1/2 tsp. sea salt
1/4 tsp. black pepper
2 cups low-sodium chicken broth
1/2 cup fat-free half and half (Land o'Lakes recommended)
3-4 slices crisp-cooked bacon, crumbled
1/2 cup (2-1/2 oz.) shredded extra-sharp cheddar cheese
2 green onions with green tops, chopped
2 Tbsp. chopped fresh parsley
Prick potatoes with a fork or knife. Bake in 400F oven for 1 hour or till potatoes are cooked through and soft inside; cool slightly. Remove skins and cut potatoes into chunks; set aside.
In 2 or 3-quart heavy pot, saute the onions in SB over medium heat till transparent. Stir in the Neufchatel cheese, followed by the flour, salt and pepper. Add the chicken broth as you continue stirring to make the mixture smooth. Mash about 1 cup of the potatoes and add to the broth with remaining potatoes. Stir, cover, reduce heat to low and simmer for 10-15 minutes to blend flavors. Add half and half, crumbled bacon, and cheese and just heat through but do not bring to a boil. Garnish soup with green onions and parsley. Yield: 3-4 servings

Wednesday, February 25, 2009

ELVIS' SANDWICH AS A PEANUT BUTTER COOKIE


Elvis' favorite sandwich supposedly was peanut butter and banana, sometimes with bacon. The King's favorite sandwich lives on in this cookie. Go with your gut --not your head -- on this one; the combination of peanut butter, bacon and bananas really is delicious. The cookie is tender and moist, thanks to the bananas and low ratio of flour, and the bacon is just a subtle undertone, not the dominant player. This would make a great breakfast or snack cookie since it has protein, fruit and legumes. I made a 1/2 recipe, printed below.
Elvis Cookies
Source: New Bern Sun Journal, 11/19/08
Rating: 8 out of 10
1/2 cup smooth peanut butter
1/4 cup brown sugar
1/4 cup sugar (or sugar substitute)
1/2 egg (1-1/2 Tbsp.)
2 Tbsp. flour
1/2 tsp. baking soda
1/4 cup crispy cooked, then crumbled, bacon (about 3 strips)
1/4 cup diced firm banana (about 1/2 banana)
Heat oven to 350F. Line baking sheet with parchment paper. In a medium bowl, combine peanut butter and sugars, beating well till smooth. (Mix by hand or with electric mixer.) Beat in egg till smooth. Sprinkle the flour and baking soda over the peanut butter mixture; stir in. The dough will stiffen up, but don't worry. Gently mix in the bananas and bacon, trying not to mash the bananas.
Using slightly wet hands, roll level tablespoonsful of dough into balls and place on baking sheets, leaving about 2" between them. Dip the tines of a fork into water, then use it to flatten the cookies until they are about 2" around. Bake about 11-12 minutes. They won't look done, but take them out any way. Cool on the baking sheet 2 minutes, then remove with metal spatula to racks to cool completely. Yield: about 13 cookies


Monday, February 23, 2009

MARTHA STEWART'S SWEET-POTATO BISCUITS


The next time Wal-Mart has sweet potatoes for $.17/lb (probably in November), buy a bunch. Bake them in the oven, scoop out the pulp and freeze it in 1/2 cup measures. Then you'll be ready for all kinds of sweet potato recipes, such as this one.
I'm not a huge biscuit fan. Oh, I like them just fine. It's my hips that don't. Biscuits are loaded with fat -- that's why they're so tender and delicious. But these are a bit lower in fat and are still light, fluffy, tender and, yes, delicious.
This is a great recipe that can be enjoyed all year round. It makes up quickly and easily, no fuss, no muss. Martha made hers plain, but I added raisins. I ate one biscuit at tea time in the afternoon, then froze the rest. The next morning I took one out of the freezer when I got up, wrapped it in tinfoil and placed it in a 400F oven for about 15 minutes and had it with scrambled eggs. (If you're a microwave fan, you could nuke it, but the texture changes, and you're destroying all food cells.)

Martha Stewart's Sweet-Potato Biscuits, Adapted
Rating: 9 out of 10
INGREDIENTS:
3/4 cup canned or fresh-cooked sweet potatoes, drained and mashed, chilled
1/3 cup low-fat buttermilk
1/2 cup raisins
1-3/4 cups + 2 Tbsp. all-purpose flour, plus more for kneading and shaping
2 Tbsp. brown sugar
2-1/2 tsp. baking powder
1 tsp. sea salt
1/2 tsp. cinnamon (my addition)
1/2 tsp. baking soda
6 Tbsp. chilled, unsalted butter, cut into pieces + 2 tsp. melted butter
Heat oven to 425F, and place oven rack on bottom third of oven. Spray an 8" cake pan with non-stick cooking spray; set aside. In medium bowl, combine first three ingredients; set aside.
In work bowl of food processor, combine flour, sugar, baking powder, salt, cinnamon, & baking soda. Pulse a few times to mix. Add butter and pulse several times, in quick, short motions, to incorporate until butter is size of small peas. Do not overprocess -- you should be able to see bits of butter. Add the sweet potato mixture all at once and process again in quick, short motions until a dough forms.
With floured hands, take dough out of work bowl and place onto a lightly floured surface. Gently pat into a 7" round. Cut out circles with a 2" cutter and gently push ends of dough in so that re-rolling will not be necessary. Lay the circles of dough in the pan -- you should get about 7 (6 around the outside edges and one in the middle). Brush tops with melted butter. Bake until golden, 18 - 22 minutes, or till a toothpick inserted in center returns clean.

Friday, February 20, 2009

NONNA'S LEMON RICOTTA BISCUITS, ADAPTED


I can no longer call these Lemon Ricotta Biscuits, because the changes I made have altered the predominant flavor. It's not lemon any more-- it's almond. So I'm renaming these wonderful little muffins to reflect that fact. I used some almond meal for part of the flour; and, instead of using all-purpose flour, I used white whole wheat. I also subbed Smart Balance 50/50 butter blend for the butter and subbed stevia for half of the sugar, making these gems a bit more nutritious... which is good, because I intend to eat them all up. The almond flavor is intense in these moist, dense scone-like muffins. I added some frozen blueberries to half and made half plain, and I like them both ways. Finally, I've finished them off with a delicious almond-oat streusel that brings them over the top. This recipe is a keeper and one that I'll definitely make again and again. P. S. You can find the original recipe on Food Network's website.
Additional notes: If you want to make these with almond meal, but don't have any, just throw some almonds in your food processor, blender or coffee mill and grind away.
Almond-Ricotta Muffins
Adapted 1/2 Recipe from Food Network
Rating: 9.5 out of 10

INGREDIENTS:
1/4 cup Smart Balance 50/50 Butter Blend
1/2 cup sugar (I subbed Stevia for half)
1/2 cup part-skim ricotta
1/2 egg (1-1/2 Tbsp.)
2 Tbsp. fat-free half and half or milk
1/2 Tbsp. lemon juice
1/4 tsp. almond extract
2 Tbsp. almond meal + enough white whole wheat flour to equal 1 cup
1/4 tsp. baking powder
1/4 tsp. baking soda
1/4 tsp. sea salt
1/2 Tbsp. lemon zest
Preheat oven to 400F.
In medium microwaveable bowl, heat the SB on high till it melts, about 45 seconds. Cool slightly. Add sugar and beat well with wire whip. Add ricotta, egg, half and half, lemon juice and almond extract and beat well till thoroughly combined and smooth. In small bowl, combine remaining dry ingredients and stir well to thoroughly mix. Add all at once to wet ingredients, stirring just to combine. (Add frozen, fresh or dried fruit if desired.) Divide batter equally among 6 muffin cups that have been sprayed with non-stick cooking spray.
Crumb Topping: 1 Tbsp. Smart Balance 50/50 butter blend
2 Tbsp. sliced almonds
2 Tbsp. oats
1 Tbsp. white whole wheat flour
2 Tbsp. sugar
In small microwaveable bowl, melt the SB on high about 25 seconds. Stir in remaining ingredients with fork till everything is mixed together. Divide topping equally among 6 muffins, pressing into tops slightly.
Place muffins in oven and immediately reduce heat to 350F. Bake about 20 minutes, or till a toothpick inserted in center returns with just a few crumbs. Cool in pans 5 minutes, then turn out onto wire rack to finish cooling. Yield: 6 muffins


Wednesday, February 18, 2009

BLACK BEAN 'N OLIVE SALSA


Just because it's winter time, and there are no decent fresh tomatoes in sight, doesn't mean you can't make salsa. How about starting with a purchased plain salsa and dressing it up? That's exactly what Kraft Foods did in this wonderful recipe that I got from their website. This is not a juicy salsa, but the flavors blend beautifully, and I find myself going back for more. The original recipe calls for Taco Bell Thick 'N Chunky Salsa, but I used Sam's Choice Thick 'N Chunky Medium, which I believe is the generic version of the Taco Bell salsa. It comes in mild, medium and hot. The medium is quite spicy and, when the extra ingredients were added, I found it to be just right -- a little heat, but not too much. (Of course, this is individual preference. If you like it nice and hot, then start out with the hot salsa; if you don't like heat in your salsa, then start out with the mild salsa.) I used fresh corn and cooked it before I scraped it off the cob. I added 2 green onions, finely chopped, and I increased the lime juice just slightly. This is a quick and easy recipe, high on my list to make again.
Black Bean 'n Olive Salsa
Adapted from kraftfoods.com
Rating: 8.5 out of 10
INGREDIENTS: 1 cup canned black beans, drained, rinsed and divided
1 jar (16 oz.) TACO BELL HOME ORIGINALS Thick 'n Chunky Salsa (I subbed Sam's Choice
Thick 'n Chunky Salsa, Medium.)
3/4 cup coarsely chopped pitted black olives
1/2 cup whole kernel corn (I subbed 2 ears fresh corn, cooked, then scraped off cob)
1 Tbsp. chopped fresh cilantro
2 cloves garlic, minced
2 green onions, finely chopped
2 tsp. fresh lime juice (I used 1 Tbsp.)
Mash 1/2 cup of the bean in medium bowl with fork. Add remaining ingredients, including remainder of beans; mix well. Cover and refrigerate 1 hour to blend flavors.

Monday, February 16, 2009

BAKED FLOUNDER WITH TOMATO SHRIMP SAUCE


In Eastern North Carolina, where I live, fresh seafood is abundant year round. We're spoiled. There's really no reason to buy frozen here. The shrimp sauce for this recipe is delicious and would be great over pasta. It was good over the fish, but I tasted the shrimp sauce and not the flounder. Flounder has a delicate, mild flavor. And when It's fresh, you want to taste it in all its delicate deliciousness. Covering it with a sauce, no matter how good, is superfluous, to say the least. If I had to rate the components of this recipe, I'd give the flounder 10 out of 10 and the sauce 10 out of 10; but together, they get only a 7.5 out of 10. Live and learn.
There was one portion left over, and I heated it up the next day for lunch. Not in the microwave. I use that monster as little as possible. Did you know that microwaving your food totally destroys all nutrients and changes the cellular structure? I heated the fish in a small frypan. It actually tasted better reheated than when it was fresh. But I still couldn't taste the flounder.
Baked Flounder with Tomato Shrimp Sauce
Source: Judy's Kitchen
Rating: 7.5 out of 10
INGREDIENTS: 3 plum tomatoes, halved
1 Tbsp. olive oil
salt and pepper to taste
1/4 cup chopped onion
2 cloves grated garlic
1/4 cup dry white wine, drinking quality
1/8 tsp. dried oregano, crushed
1/8 tsp. dried basil, crushed
1/4 cup low-sodium chicken broth
1/3 lb. peeled and deveined small shrimp
1/4 cup fat-free half and half (or cream if you con't care about calories)
2-3 pieces of fresh flounder
1/2 tsp. lemon juice
1/4 cup chopped fresh parsley
Heat oven to 375F. Place plum tomatoes, cut sides down, on a pie plate that's been sprayed with non-stick cooking spray. Sprinkle with salt and pepper and drizzle with the oil. Bake 20-30 minutes, or till tender and beginning to caramelize. Remove from heat; cool slightly. Peel tomatoes and cut into pieces. Pour the juice into a skillet and cook the onions in it on medium for a few minutes, till transparent. Add the garlic and cook another 30 seconds. Add wine and herbs and let it sizzle. Add chicken broth, bring to a low boil; cover, reduce heat and simmer about 10 minutes to develop flavors. In the meantime, pat flounder dry with paper towels; place in the pie plate and sprinkle with lemon juice, salt and pepper. Bake 15-20 minutes, or till tender and meat flakes when pierced with a fork. Add shrimp to skillet and cook quickly, about 2-3 minutes. Stir in half and half. Place one piece of flounder on each plate; top with some shrimp sauce; sprinkle with chopped parsley. Yield: 2-3 servings

Friday, February 13, 2009

INA GARTEN'S CRANBERRY ORANGE SCONES, ADAPTED LOWER-FAT VERSION

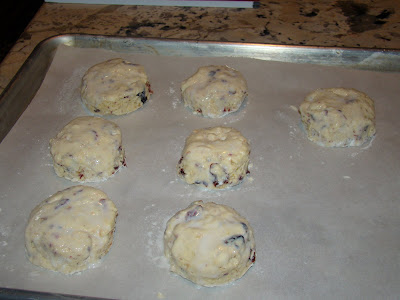
A few weeks ago, I made Ina Garten's Cranberry Orange Scones in all their full-fat glory. They were light and delicate with a richness that can only come from butter and heavy cream. But I wanted to see if they could be as good without so much fat. I used fat-free half and half instead of cream, but still used all the butter, so they still have a lot of fat. The recipe below is 1/4 of the original version, producing seven 3" scones.  Next time, I'll try cutting back on some of the butter to make them even lower in fat.


Ina Garten's Cranberry Orange Scones, Adapted Lower-Fat Version
Rating: 10 out of 10

INGREDIENTS: 1 cup all-purpose flour
4 Tbsp. sugar, divided use
1-1/2 tsp. baking powder
1/2 tsp. kosher salt
1 tsp. orange zest
6 Tbsp. cold or frozen butter (3/4 stick)cut into small cubes
1 large egg
1/4 cup + 3 Tbsp. fat-free half and half, divided use
1 Tbsp. frozen orange juice concentrate, thawed
1/4 cup dried cranberries (or dried mixed berries)
1/4 cup toasted broken pecans
Heat the oven to 400F. In work bowl of food processor, combine flour, 2 Tbsp. sugar, baking powder, salt and orange zest; pulse briefly to distribute ingredients. Add butter and pulse with quick, short motions till butter is size of small peas. Do not overprocess; you should still see bits of butter throughout. In small cup or bowl, whisk egg, 1/4 cup H&H and OJ concentrate. Add to flour mixture with the fruit and nuts and pulse again with quick, short motions, just till combined and dough forms. Scoop out the dough, which may be sticky, and place it on a floured surface. With floured hands, pat the dough into a round, 1" high. Cut with 2-3/8" diameter round cutter. You will have "tail ends" of the dough (see photo).
Just push the "tail ends" in towards the dough and cut again. If you do this with all your cuts, you won't have to reroll the dough.
The less you handle the dough, the more tender and delicate your scones will be.
Place the scones on parchment-lined baking pan. In small cup or bowl, combine remaining 3 Tbsp. H&H and 2 Tbsp. sugar and brush the mixture over the scones. (The sugar will enable the scones to brown nicely while baking and create a crisp crust.) Bake the scones for 12-15 minutes. (You can test them with a toothpick to see if they are done; be sure you don't overbake them.) Transfer to a wire rack to cool. If desired you can drizzle them with a mixture of 1/4 cup 10X sugar and 2-3 Tbsp. orange juice. I left mine plain.
Yield: seven 3" scones


Tuesday, February 10, 2009

A VALENTINE PRIMER

The cacao tree has been around for a long time; but chocolate, derived from cacao beans, is another story. The credit for finding chocolate goes to the Mayas, but their discovery was limited to a liquid -- the Old World’s “energy drink.” The Aztecs dubbed the thick, cold, unsweetened drink xocoatl (“bitter water”), and they flavored it with spices and hot chili peppers. It was a drink only for royalty, believed to impart wisdom and health.

About 1,000 years later, Columbus found the New World and discovered that cocoa beans were being used as currency and to make an exotic drink, but failed to see the potential that had fallen into his lap. A later explorer, Hernando Cortez, was underwhelmed with the bitter, spicy beverage, but enthused about converting cocoa beans to golden doubloons. On a return trip to Spain, Cortez established a cocoa plantation, thinking he would be cultivating money. He also started mixing the brew, then called “chocolatl,” with sugar, vanilla, and spices, starting a new culinary trend in Spain for the nobility.

Eventually, chocolate swept through Europe, becoming the prize of European aristocracy for centuries, while cocoa beans continued to be used as currency till the 17th century. It wasn’t until the 18th century, after the steam engine was invented, that chocolate became affordable for the masses. But it was still used mostly as a drink, until the 19th century when the chocolate bar was created.

The Mayans would be amazed at how far the cocoa bean has come. Chocolate is a worldwide industry; one of the most affluent. And now we’ve come full circle, right back to the Mayan/Aztec belief that it’s healthful -- dark chocolate, that is. But don’t get carried away yet; there are some downside risks. While dark chocolate acts as an antioxidant, reduces blood pressure, increases circulation and energy and enhances mood, it also contains theobromine, an energy lifter that can overstimulate some people, especially diabetics and the chemically sensitive. Ever eat a chocolate dessert only to stay awake all night? Blame it on theobromine. There’s also a question about how much lead is in chocolate, and how much of it can be absorbed into the human system. So, no matter how good you think it is for you, exercise temperance. And listen up: if you have a family pet, please don’t share the love – chocolate is known to be toxic to many animals. (excerpted from my current Greenbrier Gazette food column)

Below are some recipes to make your National Chocolate Day, aka Valentine’s Day, a little sweeter.

1. Chocolate Guinness Cake (my favorite chocolate cake)
2. Double Chocolate Kahlua Cake (made with a cake mix)
3. Rocky Road Squares (made with a cake mix)
4. Chocolate Chai Latte Cake (made with a cake mix)
5. Dark Chocolate Dreams Cake (made with a cake mix)
6. Black Forest Cheesecake (made with fresh bing cherries)
7. Chocolate Turtle Cheesecake (the ultimate in decadence)
8.Peanut Butter Mousse Brownies (these are incredibly delicious)
9. Special Dark Chocolate Cupcakes (made with Hershey's Special Dark Cocoa; light & moist)
10. Zucchini Brownie Cupcakes (almost a brownie, almost a cupcake, moist and delicious)
11. Mock Mocha Mousse (made with instant pudding mix)
12. Chocolate Zucchini Muffins (top-notch muffins, moist with deep chocolate flavor)
13. Chocolate Lovers Muffins (so good, these are almost a dessert)
14. Lava Rocks (chewy, chocolatey, easy meringue cookies)


Saturday, February 7, 2009

WHITE CHOCOLATE CRANBERRY OATMEAL COOKIES


Get ready for a really, really good cookie! This one is very crispy on the outside with a wonderfully tender, slightly crunchy interior. A subtle orange flavor with a hint of cinnamon perfectly complements the creamy white chocolate chips and tangy dried cranberries. These are a little piece of heaven.
A word about white chocolate chips: Please read the package labels before you buy. If you see "hydrogenated" or "partially hydrogenated" anywhere in the list of ingredients, put the package back and find one that doesn't contain those words. Look for pure cocoa butter in the list of ingredients. Wal-Mart used to have Sam's Choice White Chocolate Chips, which contained pure cocoa butter. They were Wal-Mart's best kept secret and I bought them for years, reveling in the creamy rich cocoa flavor of their chips. But to my dismay, they discontinued them recently and I'm left to search for alternatives now. I bought Ghiradelli last time, and while they're not as good as the Sam's Choice, they're vastly superior to Nestle. I would do without white chocolate if Nestle were the only supplier left on the planet.
White Chocolate Cranberry Oatmeal Cookies
Adapted from RecipeGirl.com
Rating: 10 out of 10
INGREDIENTS: 1/2 cup flour
1/4 tsp. baking soda
1/4 tsp. cinnamon
1/8 tsp. sea salt
1-1/2 tsp. grated orange zest
1/2 cup quick (not instant) oats
1/2 cup white chocolate chips
1/4 cup dried sweetened cranberries
1/4 cup toasted broken walnuts
5 Tbsp. Smart Balance 50/50 blend
1/4 cup sugar (or sugar substitute)
1/4 cup brown sugar
1/2 egg (1-1/2 Tbsp.)
1/4 tsp. pure vanilla extract
1/4 tsp. orange extract

Heat oven to 350F. Line a baking sheet with parchment paper.
In small bowl, whisk together flour, baking soda, cinnamon, salt, zest and oats; stir in chips, berries and walnuts; set aside.
In a medium bowl, beat SB and sugars till smooth. (I do this by hand, because I've found that my cookies are much better when I make them by hand. They never collapse in the center; they're always fat and puffy, and the texture is better. I believe this is because hand beating doesn't overheat the dough.)
Beat in egg, vanilla, & orange extract. Stir in dry ingredients.
Drop by rounded tablespoonfuls onto prepared sheets, 2" apart. Bake until edges are light brown, 11-13 min. (Mine took 12 min., and I put a toothpick in the centers to check for doneness.) Cool in pan 2-3 min., then turn out onto wire rack to finish cooling. Yield: 11 cookies
NOTE: If you want a bigger batch, just double the ingredients. These cookies will not spread much; they'll stay high and puffy and look like little miniature scones.

AN EASY PIZZA SAUCE


I have a favorite homemade pizza sauce, but there are some times when I'm just not up to more cooking. My "pizza expert" hubby says that most pizzerias just open a can of commercial tomato sauce and spoon it on their crust. So I decided to go that route. What could it hurt?
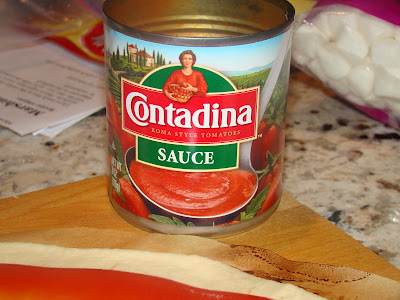
Our favorite tomato sauce is Contadina. Contadina tomatoes are milder with deep flavor. I bought an 8 oz. can for 53 cents.
This is a thin sauce, and 4 oz. (1/2 can) will cover a 12" pizza crust nicely. Spoon it out carefully.
Sprinkle the sauce with crushed basil and oregano to your liking. Top with your favorite cheeses and toppings.
Though I still like Wolfgang Puck's pizza sauce the best, you can't beat this for easy.


Friday, February 6, 2009

FOUR PIZZAS FROM ONE RECIPE

If you like thin-crust pizza, then my new favorite pizza dough recipe will provide you with 4 pizzas.

First, I made a Cippolini Onion/Roasted Red Pepper Pizza.
Cippolini onions are those little flat onions that cost so much money. But they are definitely worth the price. They have a distinct pleasing taste. Roasted red peppers are a mainstay in our home. I'm always roasting peppers, and they disappear fast. I placed strips of pepper all around the outside of the pizza, and put the onion chunks on the inside circle, leaving the center open to the sauce and cheese.
I used Kraft Italian 5-cheese blend, already grated, for the cheese. This was a delicious pizza.


Next, Guy made a green pepper, onion and anchovy pizza by just sprinkling the components over the sauce/cheese mix. The peppers were raw, and the onions were a sweet variety, but not Vidalia. He didn't get his crust as thin as I did. (Hrmmphh! And he's the tomato pie expert?) He still liked it, I guess because he made it.

Next, I made a green pepper, onion and meatball pizza. I tossed the green pepper and onion with salt, pepper and olive oil before sprinkling them over the sauce/cheese mixture. Then I cut up 2 meatballs that were left from a spaghetti dinner and scattered them around the pizza. The pizza was not overloaded, because the components were not piled on top of each other. This pizza was delicious! And the crust was nice and thin.


Last, I made a mushroom/onion pizza. I sauteed the mushrooms in some olive oil and cooled them slightly before sprinkling them over the sauce/cheese mix; then I sprinkled some chopped onions that had been tossed with salt, pepper and olive oil over the pizza. This was also delicious.
Yes, these are all traditional. No, there's nothing exotic here. But these were worth eating. We savored every bite. Not only were the toppings tasty, the crust was thin, crispy and flavorful after having cured in the fridge.


Thursday, February 5, 2009

AND THE WINNER IS.....

Thanks to the three wonderful, creative bloggers who entered my contest. All three had wonderful entries, and I wish I had three prizes to give out. But there's only one, and it is going to.....

Drumroll, please........

Rosie Hawthorne, Kitchens are Monkey Business.

Rosie, please email me (judycastranova@gmail.com) with your mailing info so POM Wonderful can mail you your prize. Congratulations, and thanks again for your creative efforts and for entering my contest.

To the rest of you readers out there who didn't enter, I promise to make the next contest easier.

BASIC PIZZA DOUGH LIKE DELORENZO'S

Always searching for the best pizza dough recipe, I stumbled on this recipe posted on the Fabulous Foods website, where blogger Cheri says that her friend, Mitch, the author of this recipe, claims to make the world's best pizza dough. With that kind of a recommendation, I gave it a try.

Pizza is a regional food. There are as many variations of pizza in this country as there are states. If you try to trace the origin of pizza in the U. S., you'll find a complicated trail; but my hubby's hometown, Trenton, New Jersey, is claimed by some to be the birthplace of the Tomato Pie. As my hubby will tell you, a Trenton tomato pie is superior to any other pizza anywhere in the world, and DeLorenzo's is the best of the best. I have neighbors from Chicago who would disagree (they pay big bucks to get deep dish pizza delivered to their door from the windy city).

But Guy is the one I live with. And I make pizza to please him, except, of course, when I make white pizza for myself. (No tried and true Trenton traditionalist would ever touch a pizza with anything other than tomatoes, cheese and traditional Italian toppings like sausage, onions, green peppers, mushrooms, anchovies and the like. Ham and pineapple pizza? No way, Jose -- at least not for Guy.) For Guy, memories of DeLorenzo's pizza are somehow imprinted with overlapping recollections of growing up. To alter any part of the formula would be changing his past. I can respect that, and I do.

Guy gives this recipe two thumbs up, way up. Since, in this household, we focus on thin-crust pizza, I can't comment on how this dough is if it's rolled out thick. But it's tender, light, crisp and flavorful when it's rolled out thin. And Guy is happy because it's "almost DeLorenzo's."

One more comment: if you're limiting yourself to non-rise pizza doughs, you'll never know the joy of tasting the full flavor of a risen dough cured overnight in the fridge. Do yourself a favor: try this one time and see if there isn't a difference. This dough is soft, supple and very easy to work with. What more could you want for making the best tomato pie?


Basic Pizza Dough
Adapted from fabulousfoods.com
Rating: 9 out of 10

INGREDIENTS: 3-1/2 cups bread flour (or part bread flour, part white whole wheat)
1 cup warm water (between 95 and 115F; it should feel comfortable on your wrist.)
1 packet active dry yeast
1 Tbsp. honey
1/4 cup olive oil
1/2 tsp. sea salt

In small bowl, stir water and honey till honey dissolves. Sprinkle yeast over water; stir; let sit 5 minutes till it bubbles. Place 1-1/2 cups flour in work bowl of food processor with salt; pulse to combine. Pour yeast mixture over flour; pulse several times to mix. Add oil and pulse till incorporated. Add remaining flour and pulse till dough forms, adding more water or flour as needed to get the right consistency. You want a soft dough, but it shouldn't stick to the work bowl. Place the dough on a floured board and knead for about a minute to build the gluten. Place the dough in a greased bowl; turn to coat both sides; cover with plastic wrap and place in a warm spot for about 45 minutes, or till doubled. (I usually put my dough in the microwave, turned off, of course, because it's a nice warm spot. Test for doubling by pushing two fingers into side of dough. If dent remains, dough has doubled.)

Punch your fist into the center of the dough and smack it around to deflate the bubbles.

Now you have some options:

1. Let the dough rise again now -- back to the microwave. The second rising will be shorter, maybe 25-30 minutes. Check the dough by pressing two fingers near the edge. If dent remains, dough has risen enough. Punch it down again and shape it. Put sauce and toppings on and bake.

2. Let the dough cure in the fridge -- separate it into 4 balls. Flatten to discs. Wrap in plastic wrap and place in coldest part of fridge (lower back). This will slow the yeast down so the dough won't over-rise in the fridge. You should be able to leave it there for a few days, but I usually take it out the second day and punch it down, then put it back, just to be sure it doesn't over-rise. You do not need to let it rise again when you take it out to use it, but bring it to room temperature before rolling it. It'll roll much more smoothly then. Note: Do not put the entire ball of dough back into the rising bowl into the fridge overnight. It will rise too quickly and your dough will not be good. You must flatten the individual balls of dough and put them in the back of the lower part of the fridge to get them cold quickly and slow down the yeast.

3. Freeze the dough for future use -- It'll be ok for at least a month. Just wrap it in plastic wrap, put it in a freezer bag, and freeze. When you're ready for it, take dough out, and bring it to room temperature before you try to roll it. That may take a few hours, so plan accordingly. And don't worry if it starts to rise again. When you're ready to put the sauce & toppings on, just punch it down first and then roll it to shape. Yeast dough is a funny thing: the more you handle it, the better it is.

Some more info: A rolling pin is the best way to get the dough rolled thin. Each of the 4 pieces should roll to a 10" - 12" crust. I was able to get four 12" pizzas, but it will depend on how thin you roll the dough. Put your sauce, cheese and toppings on and bake in a preheated oven on a preheated pizza stone. I like to place my pizzas on a circle of parchment paper on the pizza stone. And how hot is hot? I've experimented -- to get a crispy thin crust, first of all, don't overload the pizza with sauce and toppings. Make them thin, too. Preheat the oven to 550F, then turn down to 400F as soon as you put the pie in the oven. The crust should puff up quickly, and the center and the toppings should also cook quickly but not burn. This is the DeLorenzo way.